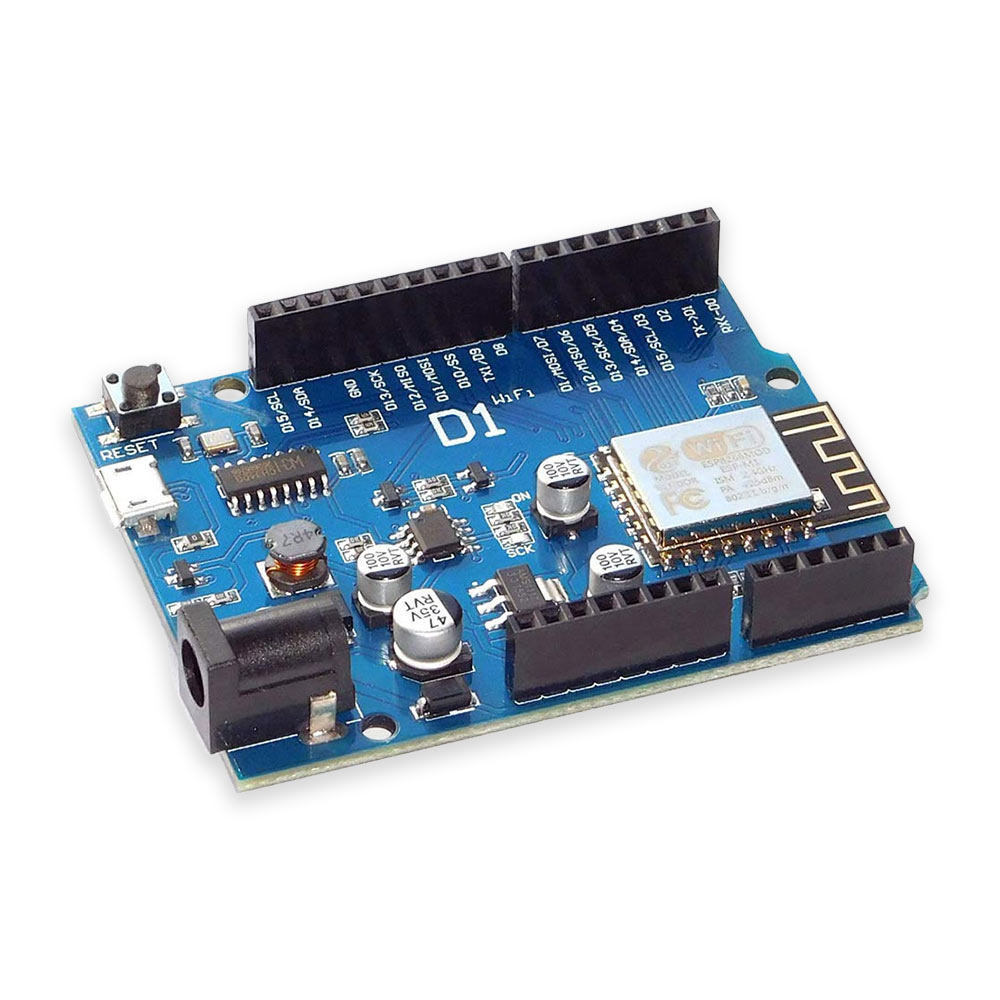
Arduino UNO R3 Wifi Board ESP8266 ESP-12F MEGA328P ATMEGA16U2
$ 11.74
Description
Description
THE LACE AT THE FRONT HAS BEEN CUT
Zara is made from ethically sourced Cambodian virgin human hair. She has transparent HD lace, bleached knots, clips, combs, and an adjustable elastic band for the perfect glue-less fit. She can be put in a middle/side part and can be put up in a ponytail.
She is a Lace Front Wig
Colour: Balayage medium brown root melting into chocolate brown/caramel blonde mix
She can be dyed/toned a darker colour by a professional.
The model wears 22″, 200% density
Colour may vary due to the lighting on images.
Density: 180/200%
Item runs true to size chart and is cut to suit our size chart. Please refer to our size chart for the best fit.
Colour may vary due to the lighting on images. The product images (with model) are closest to the true colour of the product.
To ensure your wig stays beautiful and lasts as long as possible, please follow these care tips:
Washing: Gently wash your wig every 7–10 wears using sulfate-free shampoo and conditioner. Always detangle before washing and use lukewarm water.
Drying: Pat dry with a towel and allow it to air-dry on a wig stand. Avoid rubbing or wringing the hair.
Styling: Use heat tools only if your wig is labeled as heat-resistant. Always use a heat protectant spray and avoid excessive heat.
Brushing: Use a wide-tooth comb or wig brush starting from the ends and working your way up. Never brush while wet.
Storage: Store your wig on a stand or in a satin bag when not in use to maintain its shape and reduce tangling.
Products: Avoid using heavy styling products that can cause buildup. A light serum or leave-in conditioner can help maintain shine and softness.
With proper care, your wig can last 1–3 years or more, maintaining its natural look and feel.
Processing Time:
-
Ready-made products (e.g., ponytails, messy buns, hair care items, accessories) and U-Part wigs ship the same business day if ordered before 3 PM.
-
Lace wigs are typically shipped within 1 business day; however, during peak periods, processing may take up to 2 business days. Our team of 5 professional stylists begins coloring and styling your wig within an hour of receiving your order.
Shipping Times:
-
UK Express: 1 business day
-
EU Express: 1–2 business days
-
US Express: 1–2 business days
-
Canada: 2–3 business days
-
Australia: 3 business days
-
Other Regions (Express): 1–3 business days
-
International Standard (US, Europe, Canada, Australia): 5–8 business days
Note: Delivery times are based on orders placed before the 3 PM cut-off.
Shipping Carriers:
-
Express Deliveries: UPS and FedEx
-
Standard Deliveries: Royal Mail or Transglobal Express
Enjoy Free Express Worldwide Delivery on all orders.
Officially Hallmarked by UK Assay office
Description The OTA WeMos D1 CH340 WiFi Development Board ESP8266 ESP-12E is a more Powerful Arduino with WIFI support.This development platform Espressif based on the ESP-8266 is the pins of the Arduino Uno almost compatible and can even be used as some shield modules designed for the classic Arduino Uno. Based on ESP-8266EX Arduino compatible, using Arduino IDE to program 11 x I / O pins 1 x ADC pin (input range of 0-3.3V) Support OTA wireless upload Onboard 5V 1A Switching Power Supply (highest input voltage 24V) After installing the hardware package, The direct use of Arduino IDE development, the same operation with Arduino UNO Features: Integrated 5V 1A switching power supply (maximum voltage 24V) Based on ESP-8266EX Arduino compatible, using IDE Arduino to program 11 x I/O x pin 1 x ADC x pin (input range 0-3.3V) Support OTA wireless upload Parameters:CPU 80 Mhz,Speed of 115200 You need setup CH340G(USB to UART IC) driver,if you first use it. How to get started with OTA WeMos D1 WiFi development board? WeMos-D1R2 is an ESP8266-12 based WiFi enabled microprocessor unit on a Arduino-UNO footprint. That means the board looks and works (in most cases) like an UNO. Apparently several shields, sensors and output devices that are manufactured for the Arduino platform will work on the WeMos-D1R2 with the added advantage of builtin WiFi. Differences Between the I/O Pins Though the Arduino UNO and the WeMos-D1R2 are similar, there are a few differences in their pin assignment. The above illustration provides the mapping of the pins. In some situations programs written for the UNO will need to be modified a little to the proper pin assignments of the WeMos-D1R2. More on this when we write our first sketch. Getting Started Connect the WeMos-D1R2 to Your Computer The WeMos-D1R2 board comes without an USB cable. Make sure you have a data cable and not a ordinary charging cable. A data cable causes your Windows OS to react. It announces the attachment of a new hardware and tries to install the USB drivers. It either finds the driver on your system or it does not. If it does not then you will need to download the USB drivers. The USB interface chip is the CH340G. You will need to install the drivers for this chip. A Google search for the CH340G drivers finds several sites. You can download the Windows 7 drivers from here or the Windows 8 from here. Other operating systems can be downloaded from here. Is the WeMos-D1R2 Happily Communicating With Your Computer? Lets find out if the WeMos-D1R2 and your computer are communicating with each other. Getting this step right is important for any further action. Open the Device Manager via Control Panel / Hardware and Sound. Telling Arduino Where to Find the Wemos-D1R2 Library Open File / Preferences on your Arduino IDE. You must copy the following link and paste into your Preferences and Additional Board Manager URLs dialog and select OK: http://arduino.esp8266.com/stable/package_esp8266com_index.json Either case do not click on the URL. Installing the WeMos-D1R2 Board Via the Board Manager Open Tools / Board / Boards Manager and dialog box will pop out . Somewhere in the box of filter your search you will need to enter esp8266 by ESP8266 Community select the latest version select that. The Install button will appear, click the Install button. Wait for a while. This process will take some time to download and complete. After the install it is a good idea to shut the Arduino program and restart it. Selecting the WeMos-D1R2 Board Go to Tools / Board scroll way down and select WeMos D1 R2 & mini. The Tools menu changes to the second image shown above. Configuring COM Port and COM port Speed In a recent step we had determined the COM port WeMos-D1R2 appears on. To select the COM port, go to Tools / Port and select the COM port, in my case it was COM4. Test Drive the Setup Test drive the complete setup using the boiler plate sketch. To upload the boiler plate sketch go to Sketch / Upload or use the shortcut key Crtl U or click on the right arrow button next to the check mark. A successful compile and upload means all systems are working and we are ready to get to the real stuff. Trying the Blink Example Load the packaged example Blink. To find it go to File/Examples / 01.Basics / Blink. Compile and upload as instructed in the previous step. Nothing happens. The reason nothing happens is because the on board LED on the UNO is connected to pin 13. Refer to the table in the difference between I/O pin. On the WeMos-D1R2 the on board LED is connected to pin 14. Replace all instances of pin 13 with pin 14 and save the sketch as WeMosBlink Compile and upload as instructed in the previous step. Disconnect the WeMos-D1R2 from your computer and connect an external 5V power source. The LEDs will start blinking. We aren’t WiFing yet. Programming a HTTP Server on ESP-8266-12E In this tutorial, together we will undertake the journey of programming the ESP8266-12E WIFI Development Board as an HTTP server. Using a web browser we will send instructions to the ESP8266-E12 to change it’s behavior. Throughout the process, at each step we will also look under the hood to see what is going on inside. While doing this we will control the on board LED to turn ON and OFF with commands issued via a web browser. Note: One cannot change the behavior of the board without reprogramming it. In an ideal world of IoT the ESP8266-E12 should communicate with us over WiFi and over the the internet. We should be able to control the ESP-8266-E12 over Wifi using protocols specific to the internet. We should be able to instruct the ESP-8266-12E to do. Things without having to reprogram. Opening the Connect to a Network Window In your Windows environment open the Network and Sharing Center. You get to the Network and Sharing Center via the Control Panel. Click on Connect to a network to open the Connect to a network window. Leave it open, we will be referring to this window often. You may shut the Network and Sharing Center. or Turn your WiFi adapter ON and leave it open. Writing the SimpleWebServer Sketch Connect your ESP8266-12E to your computer. Open your Arduino program/IDE and open the following code. This code will be a part of every ESP8266 sketch we write. This code does the following: Includes the ESP8266 library ESP8266WiFi.h. Creates the instance server of the class WiFiServer listening on port 80. Notice server is a global instance. Set the mode of our ESP8266 to be an Access Point (AP). Provide the SSID and password. The password / pass phrase has to be at least 8 characters long. Fire-up our server by calling the begin() method. Download and open SimpleWebServer sketch. Compile and upload the sketch to your OTA WeMos WiFi development board. Checking Our Server Open your wifi settings and connect to the network SSID called HelloIoT with the password 12345678 provide the password / pass phrase and save it. Note: Our ESP8266-12E is operating as a HTTP server listening on port 80. Looking Under the Hood Launch the Serial MonitorTools Serial Monitor or with the shortcut keys Crtl-Shift-M. Get HTTP Server Information From the ESP8266-12E Open and Upload the following code into your OTA WeMos WiFi development board and Open your serial monitor and wait for the serial monitor to print out the default IP address of the ESP8266-12E as 192.168.4.1. Web Browser Connects/Talks to Server It is time for a web browser to connect to our HTTP server.Open the following code and Upload it to you OTA WeMos WiFi development board. Compile and load to the OTA WeMos WiFi development board. Open a browser window and enter http://192.168.4.1 and and hit enter. Observe your Monitor window to check for a connection. Listen to What the Browser Is Sending to the HTTP Server The web browser connects to the HTTP server and sends the request. The server receives the request and does something with it. Rather it can do a lot of different things. Open this code, Compile it and Upload it to your OTA WeMos WiFi development Board.Enter the following in the address field of your browser http://192.168.4.1/FaranuxElectronix The browser sends a GET request to the server. Notice / faranuxElectronix following the GET request. Off all the text sent we are only interested in the first line of the request. Turning the LED ON/OFF Through the Web Browser We are ready to turn the LED on GPIO16 ON/OFF through commands given via the web browser. Firstly initialize the digital port GPIO16 as an output port and keep the initial state of the LED ON. Let us add some HTML code and some buttons. Open this code and Compile it and Upload it to your OTA WeMos WiFi development board. Open your browser and enter the following address 192.162.4.1 click on the Turn ON button to turn the LED On or Turn LED Off to turn it OFF. Do the above circuit on your OTA WeMos WiFi development board and open your web browser and enter the following adress 192.168.4.1 HAPPY IoTing!!! Resources: Arduino libraries: esp8266 by ESP8266 Community Arduino sketch: WeMosBlink SimpleWebServer_1 SimpleWebServer_2 SimpleWebServer_3 SimpleWebServer_4 SimpleWebServer_5 What you will receive: 1 x Compatible ESP8266 ESP-12E OTA WeMos D1 CH340 WiFi Arduino IDE UNO R3
Description
THE LACE AT THE FRONT HAS BEEN CUT
Zara is made from ethically sourced Cambodian virgin human hair. She has transparent HD lace, bleached knots, clips, combs, and an adjustable elastic band for the perfect glue-less fit. She can be put in a middle/side part and can be put up in a ponytail.
She is a Lace Front Wig
Colour: Balayage medium brown root melting into chocolate brown/caramel blonde mix
She can be dyed/toned a darker colour by a professional.
The model wears 22″, 200% density
Colour may vary due to the lighting on images.
Density: 180/200%
Item runs true to size chart and is cut to suit our size chart. Please refer to our size chart for the best fit.
Colour may vary due to the lighting on images. The product images (with model) are closest to the true colour of the product.
REFUND IF YOU DON’T LOVE YOUR PURCHASE* Terms and conditions apply. Learn more.
Delivery & Returns
Processing Time:
-
Ready-made products (e.g., ponytails, messy buns, hair care items, accessories) and U-Part wigs ship the same business day if ordered before 3 PM.
-
Lace wigs are typically shipped within 1 business day; however, during peak periods, processing may take up to 2 business days. Our team of 5 professional stylists begins coloring and styling your wig within an hour of receiving your order.
Shipping Times:
-
UK Express: 1 business day
-
EU Express: 1–2 business days
-
US Express: 1–2 business days
-
Canada: 2–3 business days
-
Australia: 3 business days
-
Other Regions (Express): 1–3 business days
-
International Standard (US, Europe, Canada, Australia): 5–8 business days
Note: Delivery times are based on orders placed before the 3 PM cut-off.
Shipping Carriers:
-
Express Deliveries: UPS and FedEx
-
Standard Deliveries: Royal Mail or Transglobal Express
Enjoy Free Express Worldwide Delivery on all orders.
LILLY'S HAIR SIGNATURE PACKAGING


Related products
-
Classic Polyester Drawstring BackpacksSelect options This product has multiple variants. The options may be chosen on the product page Quick View -
Clear Cinch Up Bag Drawstring Plastic BackpacksSelect options This product has multiple variants. The options may be chosen on the product page Quick View -
Classic Polyester Drawstring BackpackSelect options This product has multiple variants. The options may be chosen on the product page Quick View -
Clear PVC Drawstring Backpack w/ Matching DrawstringSelect options This product has multiple variants. The options may be chosen on the product page Quick View